Managing Disks
Disk Management Tasks
Defragmenting Disks
Files are stored in partitions and volumes on the physical disk. From the perspective of the defragmentation utility, a disk is a partition or volume that is accessible via a drive letter or mount point.
The type of file system determines how that data is organized in sectors and clusters within the partition or volume. Regardless of the file system used, the sectors and clusters that are used by a file can become distributed throughout the physical disk's read/write surfaces.
This can have a significant impact on the performance of the computer when the physical disk is a spinning electromechanical drive. In an electromechanical drive, moving parts must reposition themselves to read and write data. The time it takes the physical components to position and activate can be minimized if the blocks of data read or written to the drive are sequentially organized on the device.
- When Windows 7 saves information to your hard drive, it's a little bit like pouring water into an empty ice-cube tray -one space is filled in the tray, then the next, then the next. When you save a file, Windows pours the data into an empty space on the hard drive. If the space, called a sector, is too small to hold the entire file, the bits that don't fit will be saved in the next available space on the disk. When you open the file, Windows 7 must then access all the various bits of the file from the sectors in which they were saved in order to reconstruct it.
- Over time, you may find that your files become more and more fragmented-with bits spread over more and more sectors on the disk-which means it takes Windows longer to reconstruct them. To solve this problem, you can run the Windows 7 Disk Defragmenter utility. When you do, Windows 7 attempts to reassemble the files on your hard drive such that each one occupies as few sectors as possible.
- In the Computer folder, right-click the disk you want to clean and choose Properties from the menu that appears. The hard drive's Properties dialog box opens with the General tab displayed.
- Click the Tools tab.
- Press Defragment Now. Windows 7 launches the Disk Defragmenter utility.
- Before defragmenting your disk, you should analyze how fragmented it is. Click the disk you want to analyze, then press Analyze Disk.
- If a large percentage of the disk is fragmented, click the disk you want to defragment and then click Defragment Disk. Windows defragments your disk.
- Another way to launch Disk Defragmenter is to click the Defragment Your Hard Drive link under Administrative Tools in the System and Security Control Panel window.
- To see a report of fragmented files and changes made by defragmenting a disk, use the command-line utility defrag.exe or the graphical defragmentation utility.
- Windows 7 regularly defragments eligible drives automatically on a scheduled basis, as part of a "set it and forget it" management concept. Using the graphical defragmentation administration utility an administrator can disable the defragmentation schedule, change when and how often it runs, or manually trigger a defragmentation of selected disks before the next scheduled defragmentation. The graphical utility also allows the administrator to analyze the current fragmentation level of each drive on demand to make sure the fragmentation data is up to date.
- In the Disk Defragmenter window, press Configure Schedule. The Disk Defragmenter: Modify Schedule dialog box opens.
- Click the Run on a Schedule checkbox.
- From the Frequency drop-down menu, choose whether Disk Defragmenter should run daily, weekly, or monthly. Most users will benefi t from weekly defragmentation of their disk drive.
- If you chose Weekly or Monthly in the Frequency list, choose the day on which Disk Defragmenter should run from the Day drop-down menu.
- Specify the hour on which Disk Defragmenter should run from the Time drop-down menu.
- Press Select Disks. The Disk Defragmenter: Select Disks for Schedule dialog box opens.
- Click the disks you want to defragment.
- Press OK to close the Disk Defragmenter: Select Disks for Schedule dialog box.
- Press OK to close the Disk Defragmenter: Modify Schedule dialog box.
- Improvement made to Windows 7 defragmentation includes the ability to defragment multiple drives in parallel, instead of one drive at a time. This allows the defragmentation to complete in a shorter window of time which makes picking a maintenance interval easier. To maximize the life of computer hardware, defragmentation is automatically disabled for a drive if Windows 7 detects that a logical drive is hosted on a SSD disk device. This avoids accelerating the failure of the SSD device, which has a finite number of times that data can be written to it before the device fails.
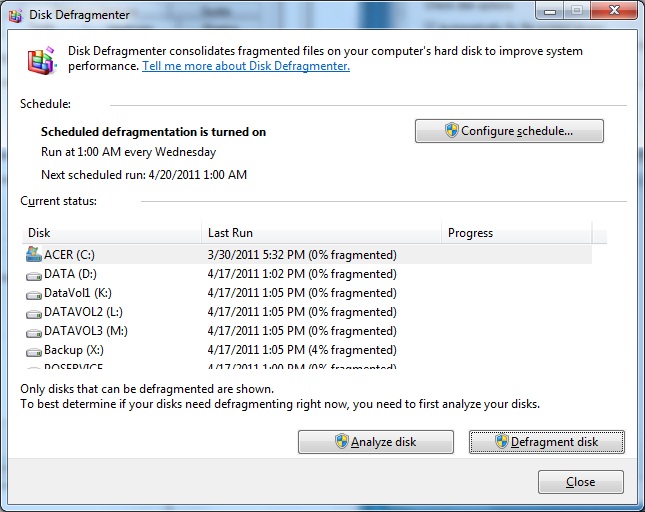
You can configure Disk Defragmenter to run automatically on a schedule you specify.