Managing Disks
Virtual Disk Management Tasks
Creating VHDs
- A VHD in Windows 7 is created as a single file on an attached physical disk drive using the Disk Management MMC console or the DiskPart command-line utility. This task requires an Administrator-equivalent user account.
- To create a VHD you must specify the following information:
- Location: The name and physical location of the file that will hold the VHD data.
- Virtual Hard Disk Size: A value specified in MB, GB, or TB (limited to 2 TB).
- Virtual Hard Disk Format: Specify either as dynamically expanding or fixed size.
- If you specify that the VHD can grow dynamically, it will grow as files are added to the VHD, up to the maximum size specified. This can be useful when application developers create multiple VHD files and they want to conserve as much disk space as possible on the physical drive. Write performance can be slow because the physical file must grow as new files are added to the VHD. If the physical disk runs out of free space before the VHD reaches its maximum size, the VHD will fail to grow and any new write operations will fail. Dynamically sized VHD files do not automatically shrink when file data is deleted from the VHD.
- When fixed size VHD files are created, they create a file on the physical disk that is as large as the Virtual Hard Disk Size specified. If the VHD size specified is 100 GB, then a file that size is created on the physical disk. The time it takes to write a large VHD file may be considerable, but the write performance to the VHD will be greatly improved. If there is not enough free disk space to create the VHD file using the size specified, the creation request will fail.
- VHD disks created through the graphical Disk Management utility will automatically attach to the operating system and appear as a new operational disk drive. The drive must be initialized, just like a new hard drive, before it can be configured with partitions to store files. VHDs are restricted to basic disk technology due to their transient existence in the operating system.
To create a VHD in Windows 7, follow these steps:
- Open the Disk Management window.
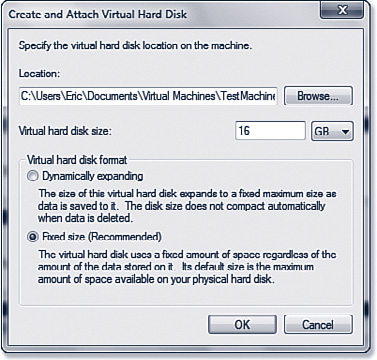
- Click the Action menu item, and click Create VHD. The Create and Attach Virtual Hard Disk dialog box opens.
- Click Browse and navigate to the folder that will hold your VHD file.
- Enter a name for the VHD in the File Name text box, and then click Save.
- You can control the size of the VHD by entering a maximum size in the Virtual Hard Disk Size box and selecting MB, GB, or TB from the drop-down list.
- Finally, you can select the size of the virtual disk, either fixed (default) or dynamically expanding A fixed size VHD file doesn't increase or decrease in size regardless of the data it holds. A dynamically expanding VHD file starts small and grows as the amount of the data it holds increases, but only to the maximum specified size.
- When you're finished, click OK. Your VHD file is created.
To initialize your new VHD, follow these steps:
- Right-click the new unallocated VHD disk number (on the left) in the Disk Management utility and select Initialize Disk.
- In the Initialize Disk dialog box, select a partition style-MBR (Master Boot Record) or GPT (GUID Partition Table). Use the GPT partition style if your disk is larger than 2TB or is on an Itanium-based computer, but be aware that this partition might not work with all previous Windows versions.
- Click OK.
- To create a volume, right-click the new unallocated disk (with the hatched background) in Disk Management and select New Simple Volume.
- The New Simple Volume Wizard starts and walks you through volume creation, including the selection of the file system (NTFS or FAT32). When you're finished, the new VHD is attached and ready for use.
For details about working with VHDs in Windows 7, read the "Frequently Asked Questions: Virtual Hard Disks in Windows 7" TechNet article at http://technet.microsoft.com/en-us/library/dd440865(WS.10).aspx.