Managing Disks
Setting Up a New Hard Disk
Formatting the New Volume
The Format Partition page, which follows the Assign Drive Letter Or Path page, gives you a chance to do just that but does not require that you do so. If you prefer to wait, you can always do the formatting later (right-click the volume's rectangle in the graphical pane of Disk Management, and choose Format from the shortcut menu.).
Your choices are as follows:
- File System: For hard disk volumes larger than 4 GB (4096 MB), your only options are NTFS (the default) and exFAT. If you are formatting removable media such as USB flash drives or a writable optical disc, other file systems are available.
- Allocation Unit Size: The allocation unit size (also known as the cluster size) is the smallest space that can be allocated to a file. The Default option, in which Windows 7 selects the appropriate cluster size based on volume size, is the best choice here.
- Volume Label: The volume label identifies the drive in Windows Explorer's Computer window. The default label text is New Volume. It's a good idea to give your new volume a name that describes its purpose.
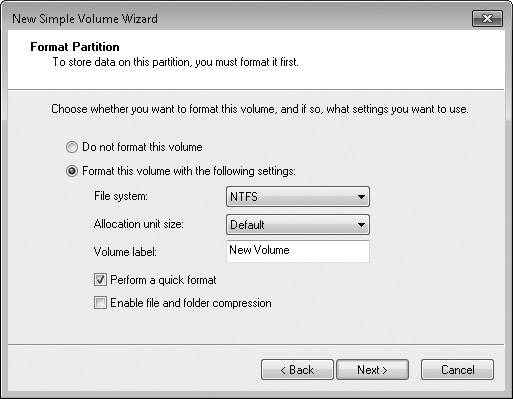
Select Perform A Quick Format if you want Disk Management to skip the sometimes lengthy process of checking the disk media. Select Enable File And Folder Compression if you want all data on the new volume to use NTFS compression. (This option, which you can also apply later, is available only on NTFS volumes.
The wizard's final page gives you one more chance to review your specifications. You should actually take a moment to read this display before you click Finish.
After Disk Management has done its work and the disk formatting is complete, a dark blue bar appears over the new volume in the console's graphical pane:

If your disk still has unallocated space (as the disk in this example does), you can add another volume by right-clicking that part of the display and choosing New Simple Volume again.