Managing File Systems
Encrypted File System (EFS)
Securing the Recovery Certificate
Your capability to recover encrypted files hinges on two factors:
- Being listed by the Windows Local or Group Security Policy as a designated recovery agent.
- Possessing the file recovery certificate that holds the recovery key data.
With a few dirty tricks, it's possible for someone who steals your computer to get himself or herself in as an administrator and pose as the recovery agent. If you really want to ensure the privacy of your files with EFS, you have to save the file recovery certificate on a floppy disk or other removable medium and remove the certificate from your computer.
To back up and remove the recovery certificate, do the following:
- Click the Start button and type mmc in the Search box.
- When the Console appears, select File, Add/Remove Snap-In.
- When the Add or Remove Snap-Ins dialog box appears, double-click Certificates, select My User Account, then click Finish.
- Click OK.
- In the left pane, expand the Certificates => Current User, Personal, Certificates.
- In the middle pane, you should see a certificate listed with its Intended Purposes shown as Encrypting File System. If this certificate is not present and you're on a domain network, your domain administrator has done this job for you and you don't need to proceed any further.
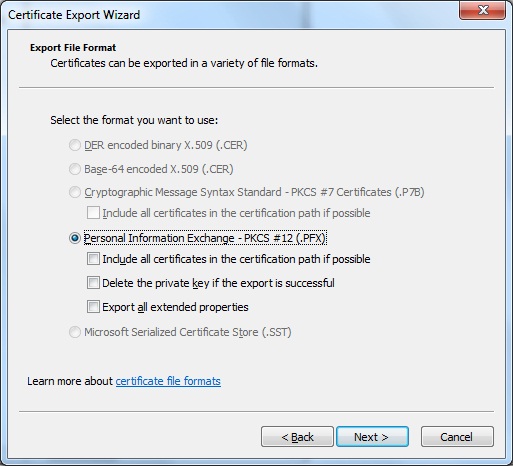
- Right-click the EFS certificate entry and select All Tasks, Export to launch the Certificate Export Wizard.
- Click Next and then select Yes, Export the Private Key, and click Next.
- Select Personal Information Exchange and click Next.
- Enter a password twice to protect this key. (You must remember this password!)
- Specify a path and filename to be used to save the key. If your system has a floppy drive, insert a blank, formatted floppy disk and type the path and filename, such as a:\recovery.pfx (not case sensitive). Otherwise, you can insert a writeable CD or DVD (recommended) or a USB flash memory drive (not recommended for permanent storage) and type the path and filename. If you use CD or DVD media, click Next and then Finish. A dialog box appears stating that the export was successful; click OK.
- Click Finish.


