Intalling Windows 7
Image-Based Installation
ImageX
The ImageX command-line tool is part of the set of deployment tools installed when you install the Windows AIK. It can be used to capture, deploy, modify, and inspect images.
One of the ways that ImageX is used is within the Windows Preinstallation Environment. You can create a bootable disk, such as bootable USB disk or bootable CD, and copy the ImageX.exe program to the bootable media. You can then boot to a system with this bootable media and use ImageX to capture and/or deploy images.
- The features and benefits of ImageX are:
- A single image file (.wim) can hold multiple images
- File-based imaging lets you capture images from one partition type and restore them on another
- Images can be taken of an entire partition or just a particular folder
- Images can be applied to an existing hard drive without destroying the existing data
- Using imaging for initial setup is significantly faster than the xcopy-based file copy
- Images can be compressed with either fast compression or maximum compression
- Images can be mounted to a folder in an NTFS partition for modification
- When ImageX is combined with Windows Deployment Services (WDS), you can completely automate the deployment process to include partitioning and formatting hard drives
- Image capture
You can capture the image of a reference computer using the /capture switch. The reference computer must have had Sysprep run on it for this to work. You would then boot to the PE on the reference computer and run ImageX with the /capture switch.
The switch requires three parameters:
- The first paramter is the drive of the operating system (such as C:).
- Next you provide the path to the location where the image will be stored and the name of the image file. The specified folder must exist or the command will fail.
- If the image file doesn't exist, it will be create.
- The last paramter is the name of the image.
- Syntax: ImageX /capture image_path image_file "description"
- Image application
You can deploy an image to a system with the /apply switch. This allows you to deploy an image that has been captured from a reference computer.
- Boot to a system using bootable media, or boot using WindowsPE and connect to the distribution share holding the image file
- Use ImageX to apply an image to the local workstation.
- The /apply switch needs three parameters:
- provide the path and name of the .wim file.
- provide an image identifier to identify the image uniquely within the .wim file. Any .wim file can hold multiple images. You can identify the image with the index number of the image or the image name. If the image is the first image in the .wim file, the index is 1.
- provide the drive (such as C: or D:) where the image will be deployed.
- Syntax: ImageX /apply image_file [image_number | image_name] image_path
e.g. boot to the PE from a USB disc that included ImageX
ImageX /apply F:\Images\Win7.wim 1 C: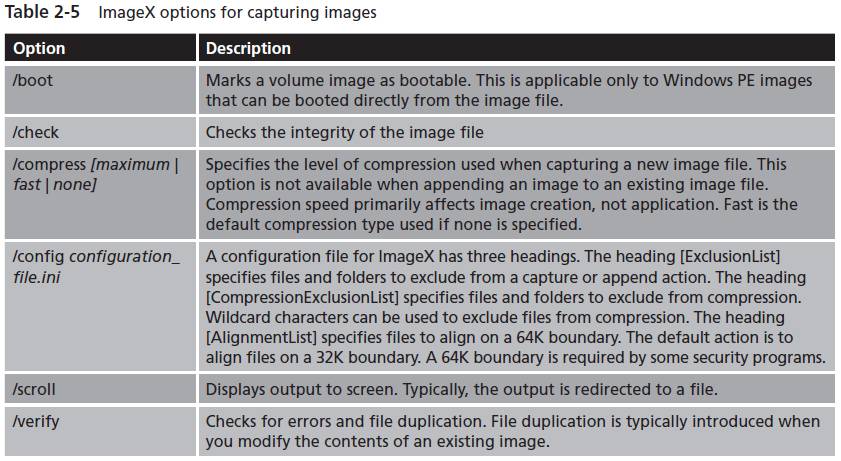
- Viewing Information about an image
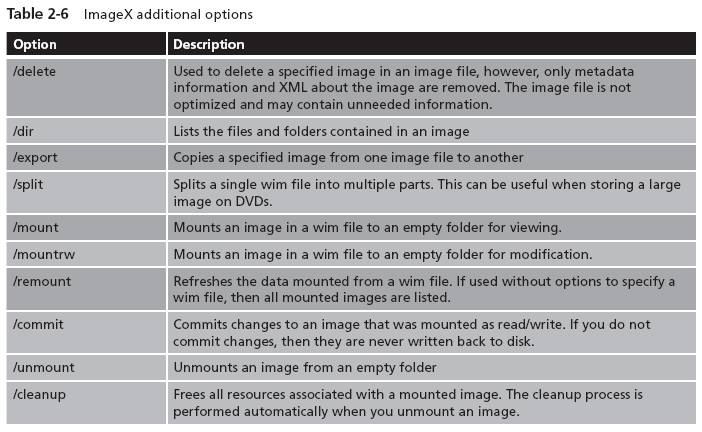
- Other image management tasks
- Mounting images: When you mount an image, it extracts all of the files for a specific image from a .wim file. You mount the image so that you can inspect, copy, and/or modify the files within the image.
- Unmounting images: Mounted images can be unmounted using the /unmount switch. This will remove all of the files and folders of a mounted image.
- Modifying images: If you have mounted an image using the /mountrw switch, you can make modifications to the files and then save them back to the original image. When you've finished making changes, you can commit the changes to the image file with the /unmount /commit switches.
- Creating new modified images: You use the /commit and /append switches to create new images from the baseline.
- Deleting images: You can delete images from a .wim file using the /delete switch.
- Viewing a list of files in an image: If you want to view a list of the files in an image without mounting it, you can do so with the /dir switch.
- Logging ImageX results: Most of the ImageX commands can be used with the /logfile switch to create a log that you can use to view progress.
- Splitting image files: If your .wim file is too big for the media where you want to store it, you can use the /split switch to split it into multiple read-only .swm files (split .wim).
The /info switch allows you to view detailed information about an existing image, including how many images are within the .wim file, the image index of each image, and other details on the image.
e.g. ImageX /mount F:\source\install.wim 1 C:\Win7Mount
e.g. ImageX /unmount C:\Win7Mount
For more information about ImageX and Windows 7, visit:
http://4sysops.com/archives/imagex-for-windows-7-new-features/.